This yummy, cheesy, bacon cheeseburger casserole is easy for weeknight dinners, potlucks and makes a great left over meal.
Okay folks, today I’m sharing one of my favorite weeknight recipes. It combines three of my favorite ingredients: cheese, beef, and bacon. It also calls for a can of cream of chicken soup. Let’s be honest, all great casseroles contain this creamy can of meaty goodness.
I found a similar recipe a few years back in a magazine and I’ve tweaked it over the years and it’s turned into this yummy recipe.
So I find that ground beef with a higher fat content does better with this recipe. Normally, I’m an extra lean kind of girl. But since the meat will be cooked twice, the added fat helps keep the meat juicy. Otherwise, I find the meat tougher and dryer. Therefore, I recommend using 93% lean 7% fat. You’ll be draining off the excess fat, but that fat in the meat will keep it soft and tender.
Now let’s talk bacon. The recipe calls for a couple of strips of bacon. In a pinch you can buy bacon bits found in the salad section. But don’t use those God-awful fake orange ones. Use 100% real bacon. Hormel makes a decent one. Otherwise, I recommend using a couple of strips of actual bacon. No need to dirty another pan. Cut it up and add it to the meat. It also makes your meat extra flavorful. Drain off the excess fat.
The recipe also calls for a can of condensed cream of chicken soup. You may wonder why were adding that to a cheeseburger casserole. Well something has to hold the casserole together. Condensed soup works well, even when diluted. If you prefer to use cream of mushroom, that would work too. I’ve used it when that’s all I had in the pantry! The condensed soup combined with a small amount of cheese really helps hold everything together.
Serving & Storing Bacon Cheeseburger Casserole
I have a habit of serving this recipe with baked bread, particularly biscuits, but this is already a heavy meal so there is no need to do that.
Like most casseroles, this stores very well in an airtight container for about 2-3 days. That’s another reason to use the fattier beef. If you plan on warming it up again in the microwave as leftovers, the fattier meat will continue to stay juicy. I’ll be honest though, we rarely have leftovers. My entire family scarfs it down. Even my one year old!
There have been times I’ve doubled the recipe just for the purpose of leftovers if we have a busy week.
Bacon Cheeseburger Casserole
I love to think of this recipe of a modern day, American shepherds pie. A yummy ground beef casserole, topped with golden brown potatoes.
Don’t forget to try one of my dessert recipes like Banana Vanilla Wafer Pudding or Rich Fudgy Scratch Brownies. Also, be sure to PIN this post for later. Before you leave, please take a moment and subscribe to my blog so you don’t miss any recipes. I also send FREE, subscriber-only printables and recipes. Thanks for your support!
There is lots of misinformation about homeschooling. So today, I’m going to set the record strait by debunking myths about homeschooling.
Second Generation Homeschoolers
I had the honor of being a product of both private school and homeschooling. I attended private school in my early elementary years and was homeschooled thereafter for a number of reasons.
These days, I homeschool my two boys. Well, my oldest. T is a tad too young for standard teaching yet, but in a year or so, we’ll start tot school. Whenever I share my love for homeschooling, I receive a range of reactions from fellow parents. It spans from concern, to disgust, to sheer puzzlement. Others love the idea, but you can see the concern on their face as they ask questions like, “won’t they miss having friends?” “How will you know if they are up to par with public school kids?” Lastly, I hear a common exasperation, “I don’t think I’d have the patience for it.”
Today, I’m sharing some common answers to tired, clichéd stereotypes and assumptions surrounding the homeschooling world. As a second generation homeschooler, I’m debunking myths about homeschooling.
Debunking Myths About Homeschooling
I’m Not Qualified or Smart Enough to Teach My Children
Yes, you are. Public school teachers have support and direction and so do homeschooling parents. In fact, in most large cities, there are homeschooling conferences for parents and their “professional development.” There is a huge selection of teacher-led curriculum which offers plenty of explanation and instructions to properly teach it. In addition, there are support groups, both online and local, to learn from other parents.
I know what I’m about to write is controversial because we all love, respect, and appreciate teachers. But because there is a perception that teachers are smarter or even better equipped to teach children than parents, allow me to share some facts. Statistically, education majors (teachers) have some of the lowest SAT scores by intended major. If you look at the 2016 report from Collegeboard.org, it finds that out of the 38 intended majors, teachers are 26th on the spectrum. The only mean scores beneath them are careers that don’t require degrees like culinary professions, agriculture, construction, and security. Education majors score poorly on the SATs and those scores have been declining since the 1970’s. The reality is that most teachers just aren’t impressive academically. So yes, be assured you’re likely as “smart” as the average teacher. Teachers are incredibly special because they have big hearts for teaching children. It is their love and dedication for children that really makes teachers invaluable.
Courtesy of Pexels
My Children Won’t Be Socialized
This is by far the biggest myth surrounding homeschooling. However, I do understand why someone would assume that. But if by “socialized” you mean bullying, drugs, underage sex, drinking, mass shootings, and suicide, then you can keep your public school “socialization.” My in-laws teach in a small town in Canton, Ohio. In one year alone, their small town school district experienced a cluster of six teenage suicides. Children consume candy laced with narcotics. Bullying (along with cyber bullying) is an everyday occurrence. I’ve seen the village and don’t want them raising my child. Lots of homeschooling parents do so, because they don’t like the negative socialization found in public schools.
Many people believe homeschooling coops children up in a house all day. Homeschooled children have as much social interaction as any other kids. These days, there are so many social outlets for kids taught at home. There are co-op classes, play dates, field trips, church ministries, sports, band, science labs, summer camps, orchestra, debate, drama clubs, and other extra-curricular activities. The difference is that you can be selective with whom your child associates. In public schools, you have no control over your child’s classmates.
Homeschooled Children Are Sheltered
This leads us to our next myth. When I’ve explained the previous reason, most people will then say I’m sheltering my children from the real world. Believe me, as a homeschooled child, I was anything but sheltered. Being taught by my parents helped me gain real life experience; things you don’t learn from a text book. I began working at fourteen, doing accounting for a small business. At thirteen, my poetry was published in a chapbook. By sixteen, I bought my own car (and paid for the insurance and gas myself). At seventeen, I was living in Europe alone training in art. By twenty, I was a curator at a gallery in England. Contrary to popular belief, parents don’t coddle their homeschooled children. Rather, they are quick to adopt self-sufficient behaviors.
Homeschooled children aren’t sheltered. They are rooted. Children are grounded by parents instead of being influenced by strangers and peers. You can firmly establish your children in your family’s values before going out into the real world.
My Child Will Fall Behind Public School Kids
Part of homeschooling is doing away with the boundaries enforced by the standardization of public schooling. Your child will flourish beyond the boundaries of grade levels, which is a product of public school education. That’s because homeschooling is more mastery-focused than grade-focused. You move on when you master something, not because the school year is over.
When I entered college, I found it shocking how many young adults didn’t know basic Geography. Shockingly, they couldn’t tell me why we entered World War I or with whom we fought. (Kaiser Wilhelm who?) Most had never read classic literature. In fact, most couldn’t even name the parts of speech. It was shocking. For all they are taught, few understand (or remember) the fundamentals.
My own mother-in-law said they no longer assign book reports in her 8th grade class because kids simply obtain the book synopsis online. A cashier clerk I met (earning her master’s degree) couldn’t compose a letter or use a postage stamp. We have high school graduates who can’t read cursive. Also, in a recent study, 32 million American adults are currently illiterate despite the last few generations having access to compulsory taxpayer-funded public school. Nineteen percent of high school graduates are functionally illiterate. Homeschoolers score 15-30% higher on standardized academic achievement tests.
Homeschooling Is Expensive
I’ve also heard claims that homeschooling is for the rich and conversely that homeschooling is for the poor. It’s clear, many people just have no idea what homeschooling costs are. Parents choose how much or little they spend on curriculum. Homeschoolers spend an average of $600 per child annually. It is still much cheaper than charter or private schools. There are lots of options for used curriculum. If you have multiple children, you will most likely be using it more than once. Also, if your child is kindergarten or younger, there is a lot of free curriculum available. Many states even offer public school at home, online.
Homeschooled Children Are Abused
This always leaves me flabbergasted. I’ve actually heard this more than once. There might be odd cases where unfit parents hide behind homeschooling to keep their children hidden and abused, but those are extremely rare cases. In most instances, the 2.3 million homeschoolers come from loving homes seeking the best for their children.
I Can’t Work and Homeschool
Not true! I know a lot of homeschooling parents that work from home virtually and homeschool. In fact, I know a doctor who works part time at a clinic and homeschools her kids when she’s home from work. These days, there are lots of ways to do it. For example, depending on your state, you can even have someone else do it. For instance, in Texas, you can homeschool up to five children (yours or others) before the state requires you to have a day care certification. Some parents work different shifts so they can homeschool in shifts.
Also many parents work a 40-hour week and homeschool for 20 hours a week. Did I mention that schooling goes by a lot faster when you only have a couple of kids to teach instead of classroom of 30? Remember, with homeschooling, you aren’t locked into specific hours, days, or even the time of year. Homeschooling allows for maximum flexibility.
My Child Won’t Do Well In College
Nonsense. These days, colleges are recruiting homeschoolers at the highest rate ever. They are desirable because homeschoolers are typically highly motivated and independent learners. They also typically outperform their publicly-schooled peers. In a recent Huffington Post article, homeschoolers graduate college at a higher rate and earn higher GPAs.
Homeschooling is Only For Religious Families
Not true! These days there are a growing number of secular families joining the homeschooling circle. There are lots of secular parents who are displeased with the educational and social problems of public schooling. Like faith-based homeschooling, there are lots of curriculum and support circles that don’t incorporate religion.
Homeschoolers Just Play All Day
Part of this myth stems from the fact that homeschooling kids are out and about during the day. Others just simply don’t think homeschooling is serious learning. Both assumptions are wrong. Homeschoolers have the flexibility to leave during the day and continue studies later, but everything is also a learning opportunity. Grocery shopping becomes a real life math application. For example, have your child figure out how much the 30% sale is or have them perform mental math as you fill the cart. Most homeschooling parents take every opportunity to teach life skills and incorporate learning into everyday situations. Conversely, at a young age, play is healthy and necessary for cerebral development. Homeschooling allows parents to balance play and studies as suited for each child.
Homeschooling Is Just For White Families
At one time, this may have been relatively true. However, over the last decade or so, minorities (like myself) have been taking back control of their child’s education. In fact, homeschooling by minorities is surging. Blacks in particular turn to homeschooling to protect their kids from the low expectations towards their race, especially for young black boys. For minorities, homeschooling is often sought to level the playing field and thereby providing every advantage to their children.
In Conclusion
If you are considering homeschooling, I hope I have helped dispel some misinformation. Debunking myths about homeschooling is very important because I think a lot of interested parents, don’t pursue it because of misconceptions. Understand there are pros and cons to both systems. This post isn’t meant to be snippy or condescending. Ultimately, it’s a personal choice for each family.
On my blog here, I provide lots of homeschooling resources, so before you leave, please take a moment and subscribe.
Before you go, pin this post for later and see my other post Why We Homeschool.
Today I’m showing you how to make this delicious pie-tart crossover. If you’re a decadent chocolate lover, you’re gonna love these mini chocolate fudge tarts.
Welcome, friend! I hope you’re enjoying some of my chocolate themed recipes. The first time I ever had chocolate tarts was in France. Oh my Lord, do the French know how to do desserts. I’ve had many varieties of chocolate pies and chocolate tarts throughout the years. I’m always in the market for a new or different recipe. Today, I’m sharing my recipe for mini chocolate fudge tarts.
Personally, I love making these for dinner parties. They seem really fancy, because tarts sound fancy. But honestly these are very easy to whip up. I love them because I can keep the frozen tarts in the freezer and if I’m called to make a dessert to take somewhere I almost always have the ingredients I need sitting in my pantry.
Ingredients
If y’all have followed my recipes in the past, y’all know I’m a sucker for dark chocolate. I know. I hear some of you out there going, “ewww!” Hear me out. I prefer using semi-sweet or dark chocolate because you can control how sweet you make it by adjusting the sugar you add. If you want it sweeter, you can add more sugar, but the secret to really rich chocolate desserts is by starting with dark chocolate.
As I’ve mentioned in previous recipes, you want to use a good quality dark chocolate like Ghirardelli, but there is certainly nothing wrong with using Nestle Toll House morsels of whatever you have on hand. Chocolate should always be melted in a double broiler. A double broiler is just one pot stacked inside another. The bottom pot holds water. This allows chocolate, butter and other sensitive ingredients to melt slowly and reduces the risk of scorching. They sell double broilers in stores, but you can just as easily make your own using nested pots.
Also, if you want, you could also make your own tart shell. I have some great pastry and tart shell recipes, but for this recipe which calls for mini shells, I typically use frozen ones. It cuts a lot of time and expense out.
Serving and Storing Mini Chocolate Fudge Tarts
If you want to keep these tarts extra fresh, I recommended storing in the fridge or a cool, dry place. Chocolate and heat don’t do well together.
When you are ready to serve, I recommend them being at room temperature. There are lots of ways you can serve these tarts.
Whipped Cream
Sprinkle confectioner’s sugar
Caramel drizzle
Caramel drizzle & sea salt
Fresh raspberries
Fresh strawberries
I kept it simple for the purpose of taking photos. I wanted you to be able to see the tarts themselves, but you can dress these tarts up with any garnish you want.
Mini Chocolate Fudge Tarts
Mary Lentz
Fudge meets pie in this delicious, personal sized, chocolate tart recipe.
Place frozen tart shells on light colored baking tray and bake for 30-40 minutes or until golden brown. You can prepare the chocolate while the tarts are baking.
In a double broiler, on medium heat, melt butter.
Add cream and vanilla.
Slowly add the chocolate chips, stirring well as they melt.
Once chocolate is completely melted, stir in sugar.
Remove shells from oven. Let stand for 10 minutes.
While still warm, pour chocolate mixture into tart shells.
Place the tarts in the fridge for 1 ro 1.5 hours until they firm up.
Enjoy with whipped cream, sea salt, or caramel drizzle.
Keyword baked goods, chocolate, chocolate dessert, chocolate desserts, chocolate fudge, chocolate pie, chocolate tart, dark chocolate, easy desserts, fudge, fudgy, mini pies, mini tarts, pastry, personal pies, pie, pie crust, tarts
Don’t forget to pin this recipe for later and as always, don’t forget to subscribe to my blog, so you never miss a post or a recipe. Thanks for reading!
Processing…
Success! You're on the list.
Whoops! There was an error and we couldn't process your subscription. Please reload the page and try again.
If you’re a decadent chocolate lover, you’re going to love these rich fudgy scratch brownies! Learn how to chocolatey pieces of heavenly goodness in this simple recipe.
Hey there, friends! Boy do I have a treat for you. Literally and figuratively! Today I’m sharing my favorite recipe for the fudgiest, richest, most delicious brownie you’ve ever had. I’m gonna show you how to make rich fudgy scratch Brownies.
For years I relied on boxed brownie and cake mixes. That is until I realized how easy it is to bake from scratch. I was shocked to learn this recipe is only about 5 minutes longer than using a boxed mix, but the taste from scratch is unbeatable.
First, brownies are cooked on a low heat, similar to cake. The difference is that brownies will appear under baked, but will cool to firmness. I recommend moving the oven racks down so that the brownies will be in the dead center of the oven. This recipe makes 9 brownies in an 8 x 8 pan. I recommend using a glass baking dish or light colored pan. If you are using a dark metal pan, you’ll need reduce the cook time. It still isn’t ideal though. That’s because dark metal absorbs more heat than light colored pans. That means that dark metal pans brown cake and pastries too quickly on the sides before it is baked through in the middle. Dark pans are better for baked goods where crispiness (or firmness) is what you want, like pizzas, cornbread, and flatbreads.
Ingredients
Butter
I recommend using unsalted butter. You will melt the butter in a double broiler, with the cocoa powder. A double boiler isn’t anything fancy. Fill up a pot with hot water on this stove. In a smaller pot, add your butter and place that pot in the water of the bigger pot. This allows you to melt the butter without scorching it. Butter will brown when scorched. Once the butter is melted you can add our cocoa powder a little at a time. Then add your vanilla and sugar slowly as you continue stirring. This process is what makes the beautiful crackle top we love on brownies.
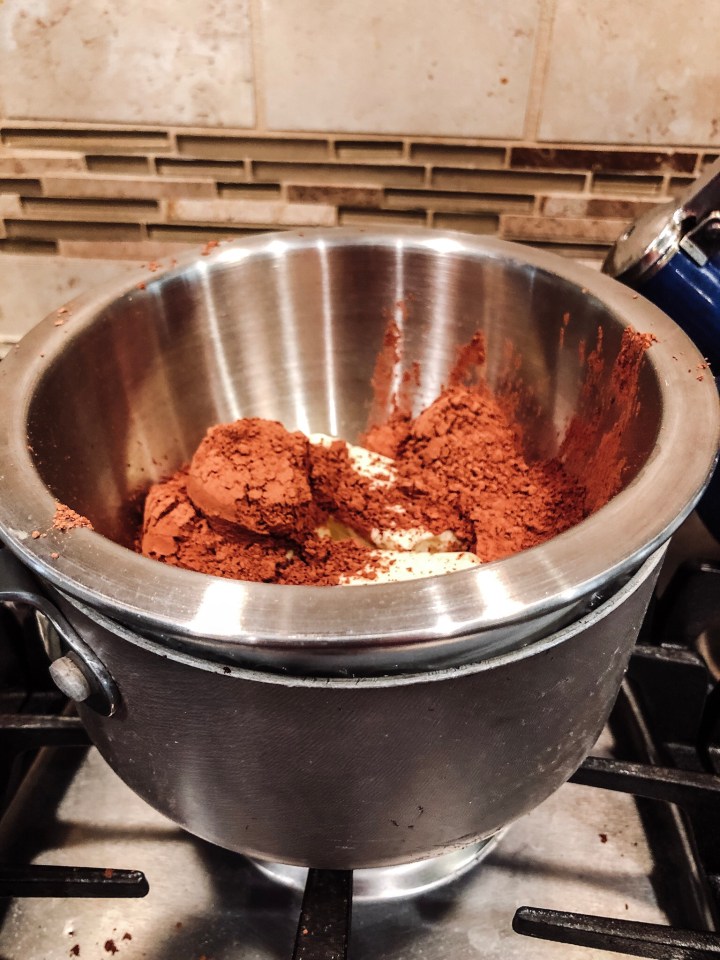
Cocoa Powder
Part of making the best brownies is using quality chocolate and cocoa powder. This is where the richness of the chocolate really shines. Will Hershey’s be okay? Sure. If that’s what you have you can use it. However, I recommend using a high quality powder like Ghirardelli or Dutch-process cocoa powder and should be 100% Unsweetened (don’t worry, we’ll sweeten it up plenty!) Using this ensures the deep, decadent chocolate flavor we’re looking for. Once combined, remove from the heat. Continue adding your ingredients including the vanilla extract and salt.
Flour & Eggs
I recommend only using two eggs. Some recipes call for three eggs in brownies, but it’s makes it more cake-like and less fudgy. I also recommend adding your eggs one at a time to make sure it’s fully emulsified into the batter.
Unlike a cake, you don’t need a mixer for brownies. I recommend stirring/folding about 30 to 40 times to make sure everything is good and mixed. It’s normal for brownie batter to be a little gritty. At this time you can also add walnuts (optional) or chocolate chips. I love adding chocolate chips and I prefer to add semi-sweet, but you can milk chocolate if you prefer.
Spread the batter in a greased pan. The batter will be very thick and you’ll need make sure it is spread evenly by working it away from the middle and towards the sides.
Checking For Doneness
As I mentioned before, brownies are appear under-baked. That is what is contributes to the rich fudginess. But how do you know you aren’t eating raw batter? The edges of the brownie will become firm and pull away slightly from the pan. If you insert a toothpick in the center you should have some wet crumbs, but it shouldn’t be runny. If you need to err on the side of caution, it’s better to be slightly under-baked than over-baked. Over-baking will ruin the entire pan of brownies. Let the brownies cool completely before cutting.
Rich Fudgy Scratch Brownies
These melt-in-your mouth brownies are rich in fudgy goodness. Once you try this easy scratch recipe, you won’t want to use the boxed stuff again!
I hope you love these brownies as much as my family does. Remember it normally takes a few tries to really perfect a recipe so don’t give up on baking from scratch! If you’re a chocolate lover, take a look at my The Best Hot Chocolate Recipe. I promise you’ll love it.
Before you go, don’t forget to pin this recipe for later. Also, make sure to subscribe to my blog to make sure you never miss a post. I post recipes often! Thanks for reading!
Trusting God in tough times is hard, but I’m here to share some hope on how to keep your focus on the Lord and his blessings that are coming your way.
Courtesy of Unsplash
Trusting God in tough times is one of the hardest things we will have to overcome as Christians. Worry is a symptom from doubting God. If we believe that he will sort out of problems and make good on his promises, there is no reason to worry. If we believe he is omnipotent and has control over all circumstances, we shouldn’t grapple with trust. And yet…we do.
A Hitch While Getting Hitched
When I was getting married, my husband wanted a cookie cake as his groom’s cake. I tried ordering it advance, but the store told me the soonest I could order it would be two days in advance. So, I went down to order it two days before my wedding. I asked for a cookie cake with a Collegiate block ‘O’ written in Scarlett and grey. The man behind the counter just stared blankly at me as I continued describing it. I even drew it out on a piece of paper. He then said, it might not be him that makes it and he had no idea how to leave the drawing for the next person. I left frustrated and in tears.
I called my maid of honor and started crying. With all the things I had to do for the wedding over the next 48 hours, I was totally stressed over the potential of disappointing my new husband over a groom’s cake. I sobbed. She listened. Then she said calmly, “I don’t want you to worry about this anymore. I will take care of it. Even if I have to bake it myself, it will be there. Enjoy your wedding and don’t worry about this anymore.”
Ensuing Peace
I can’t even begin to describe how I felt. The burden had been lifted and I totally believed with all my heart that she would fix it. I trusted her to make it right. And…I stopped worrying about it. Sure enough, on my wedding day, there was a huge cookie cake, decorated with the block O, sitting there right next to my tiered wedding cake.
I realize this could have ended differently. But my point is the peace I felt knowing it was her problem and not mine anymore. This should be the same peace we feel when we shift our problems over for God to deal with.
I get it. Our problems are often bigger than a wedding cake. We suffer life altering things like divorce, death, chronic illnesses, job loss, and financial woes. I get it – but so does God. Scripture calls him compassionate. He knows what you’re facing and he is compassionate towards you.
For we do not have a high priest who is unable to sympathize with our weaknesses, but one who has been tested in every way as we are yet without sin.
Hebrews 4:15
Why We Can’t Find Peace
We can’t see God face to face and that causes us to wrestle with faith. Even the disciples struggled to believe after witnessing miracles of Christ. Remember Peter on the water? When Jesus called him to walk on water with him he started to sink. Why? He started to doubt.
Jesus immediately reached out his hand and took hold of him saying to him, “O you of little faith, why did you doubt?
Matthew 14:31
It is in our very nature to doubt. We’ve got serious trust issues! This is why it is so important to recount the times God has come to your rescue. I keep a prayer journal (war binder) with all my answered prayers. It proves to me that God is listening – or more to the point, that he cares an answers prayers.
Trusting God in Tough Times
Set Your Mind on Higher Things
Too often we tend to dwell on what is wrong, rather than what is right. This is why Paul reminds us in Philippians 4:8 to purposely reset our minds.
Finally, brothers and sisters, whatever is true, whatever is pure, whatever is lovely, whatever is admirable – if anything is excellent or praiseworthy – think about such things.
Philippians 4:8
The Psalmist echoes Paul. He tells us how to trust in one simple sentence – by turning your thoughts often to the Lord. That means when doubt and worry start to creep in, you immediately turn to God for reassurance. His promises in scripture is the reassurance he has left for us. We deliberately need to choose to think of good things instead of our problems. The more you worry, the more your fear will grow.
Gratitude
One thing is certain, after this problem, you will face another. Such is life. There will always be something about which to grumble and complain. Again, focusing on what is good, will make you feel better – and there is always something for which to be grateful. Gratitude grows contentment and joy. Spend time praising God and I promise you’ll feel better. I love reading the Psalms. The Psalmist laments and cries out to God about his troubles, but then immediately praises God for being God. He encourages himself in the Lord, our savior. Magnify God, not your problems.
In every circumstance give thanks; for this is God’s will for you in Jesus Christ.
1 Thessalonians 5:18
There won’t always be someone to cheer you up or encourage you. It might be the friend, spouse, or parent, with which you have trouble. You can’t rely on imperfect people to be your “well.” Draw from the well that never runs dry! Learn to encourage yourself in God’s goodness.
Shift Responsibility
You are limited. God is limitless. He is both powerful and mighty. He can take on any mess. Make it his problem to fix. Let him shoulder the burden of working out the kinks. I promise you, you won’t be disappointed. When you know every mystery in the universe and control all circumstances, our problems aren’t a surprise. Wreckage and ruble is easy to clean up when you’re the creator of the entire world.
Come to me, all who labor and are heavy laden and I will give you rest. Take my yoke upon you and learn from me, for I am gentle and lowly in heart and you will find rest for your souls. For my yoke is easy and my burden is light.
Matthew 11:28-30
A yoke is a wooden beam fastened to oxen (one older, one younger), to pull heavy weight in pairs. If the young oxen tires, the older one will bear most of the weight. Jesus invites you to share your heavy burden with him. Fasten yourself to him and let him take on the weight of your troubles. To him it is easy and light to bear. Also, the analogy of the yoke does not promise the burden will disappear, rather we are to walk in step with him and he will carry us through.
I will both lie down and sleep in peace, for you alone, Lord, make me live in safety.
Psalm 4:8
In Conclusion
If you are struggling with trust, faith, or anxiety or worry, I encourage you to read my other posts:
Thank you for taking the time to read Trusting God in Tough Times, with me. If you are going through a hard time and are burdened with worry I’d like to pray over you.
Lord, thank you for inviting us to share our burden with you. Please help my friend, who is struggling with believing that things will get better. Bless them with the gift of faith and trust. Assuage their anxiety and worry and help them cast their care onto you and you alone. Thank you for always showing us compassion and mercy. Even though we don’t understand why this happening, we give thanks to you and know you are working it out for our good. Amen.
Before you leave, please subscribe to my blog for more inspirational posts.
Processing…
Success! You're on the list.
Whoops! There was an error and we couldn't process your subscription. Please reload the page and try again.
Date nights can be hard to come by, especially when you have kids and are on a budget. Here are easy cheap date nights at home!
Hey there, girl! I know how tough it is to get date nights! When I was first married it was so easy to have a date night. But once kids got here, finding time for a date night was super hard. I mean just getting the kids in bed and sleeping at the same time requires all the stars and planets to align. I get it!
My hubby and I don’t have a babysitter or family that babysit regularly. Therefore, we gotta get pretty creative when it comes to date nights. Date nights at home are totally doable when you have kids. I’ve found it’s much better than doing nothing at all! We’ve actually had some pretty fun nights at home. I thought I would share some easy cheap date nights at home that have helped us keep the embers burning, stay connected and have fun together!
Puzzle Night
I know what you’re thinking. This is boring, but my husband and I actually end up loving this. Its low-key and is actually a nice way to relax together. We talk and connect while we do it. Maybe it’s because puzzles require to you to work together towards a goal. You can always put on some music and pour a few drinks. During the winter, I make a steaming pot of hot chocolate and we do it fireside. There are lots of ways to make this special. Puzzles are relatively cheap and you can do them again and again.
Dessert Flight
Okay, who doesn’t love desserts? This is a simple date night and you don’t actually have to do any cooking. Go to a bakery or visit the bakery at your local grocery store. Ours has some really nice single cheesecake, cupcake and cake servings. Pick up a few pieces and once the kids are in bed, light some candles, put a pretty tablecloth on the table and set out a dessert tasting. You can make a special pot of amaretto or Irish creme coffee and you can always use decaf coffee if you are worried about it keeping you up at night!
Courtesy of Unsplash
The Not So Newly Wed Game
For this game, come up with 20 or 30 questions that can be posed to both of you. Get creative! The best questions are ones you don’t really know the answer to or have never discussed before. Then take some time and answer the questions as you think your spouse would answer them. Your spouse does the same for you. Then go back through the answers and see how right you were.
Themed Date Night
After my first son was born, I did a themed at home date night once a month. So instead of just plopping in front of the TV, I tried to make it special by having a recurring theme. For one year, we “visited a country around the world. Example: One month was Ireland. I fixed Irish coddle and soda bread for dinner and we watched Michael Collins. Next was Egypt. I found some Egyptian recipes on Pinterest and we watched The Mummy. Another month, I made some homemade pasta and we watched The Godfather. You get the idea. We found that by creating a theme night, it made the run-of-the-mill tv night much more fun.
Board Game Night
I know you’ve heard this one before. But game nights can be so much fun. These days, there are lots of two person board games. Here are some of my favorites:
Or you can go the retro kid night and do a fun game like Operation, Jenga, Chess, Checkers, Guess Who or another games.
Fondue Night
This is one of our favorite things to do, but we love fondue night. We tend to do this more during the wintertime. Fondue is easy to do. It’s just Swiss cheese, white wine, garlic, and lemon juice. Obviously you need a fondue pot, but you can find cheap ones on Amazon. We cut up dippers like shrimp, apples, salami, bread, tomatoes, and veggies. You could also do a raclette if you didn’t want to do a fondue pot. They are just as fun. Then, yes….we do chocolate fondue. In fact, you can always just do that once the kids are in bed. We do Chocolate and peanut butter, s’mores or sea salt caramel. There are lots of fun combinations.
Floor Picnic
This is kind of a spin off of the fondue night. But another fun way to change up dinner is to do a floor picnic. Comfy pillows, warm throw blankets, candles, and lots of yummy goodies. Did I mention wine? Wine is also good. You can do a full dinner or just keep dinner light with cheese, fresh fruit and simple pairings.
Courtesy of Unsplash
Mixology Lab
If you and your partner like cocktails, try trying your hand at mixing a few cocktails at home. Pinterest is full of all kinds of great recipes. If the weather is nice, go sip them on the patio and stargaze. Another take on this would be to create your own wine or beer flights. But this can get pricey. I recommend planning around what you already have in your cupboards to save cash.
Spa Night & Couples Massage
Everybody needs a little TLC. So why not, include your partner? Turn on some candles, put on some relaxing music (yeah, that’s right – slow jams) and give each other a spa treatment. Take a shower together and take turns giving each other a tantalizing massage. Touch is a powerful way to promote intimacy. Use essential oils to add some aromatherapy into the mix.
Well, I hope I’ve given you some ideas for some easy cheap date nights at home. Just because you have kids doesn’t mean you have to wait for a babysitter. Sometimes the best date nights are the ones that are at home and low key. Spending quality time together is all that really matters.
This vertical layout, is great to start those summer vibes. Please join me for the first in the series, Mermaid Vibes Plan With Me.
Happy Planner News
Hey there, friend. Welcome to all new series on My Beautiful Mess! I was very excited when, in May, my blog post, How Happy Planner Changed My Life, was recognized at the Go Wild planner conference in Las Vegas by the Happy Planner. Yay!
The post was first seen by Hannah and Stephanie in February and they reached out to me. I had no idea how they planned to use it, but I was very honored that they chose to share it with others.
It was such an honor and even though I didn’t make the planner squad (boo hoo), I’m still excited to be ambassador on my own. So today, I’m starting a Plan With Me series. Here I’ll show you how to decorate your Happy Planner. Hopefully, I’ll give you some ideas – but your planner should always reflect who you are!
Mermaid Vibes Plan With Me
When I think of mermaids, I think of hues of blues, greens, and purple. These colors remind me of the sea. Thankfully, in the second color story book, there are actually mermaid theme stickers.
I have found that the second colorful boxes sticker value pack have boxes that match perfectly with the color story sea stickers. This is my very first Plan With Me video, y’all so be kind! I promise I’ll get better at this.
Materials
Vertical planner
Color Story 2 Sticker book
Colorful boxes 2 book
Before You Go
Make sure to check out some of my other Happy Planner posts.