Sourdough Cheddar Bay Biscuits

Looking for things to do with your sourdough discard? Here is a recipe for sourdough cheddar bay biscuits that will be the perfect addition your weeknight dinner.

Sourdough cheddar bay biscuits
This post contains affiliate links. Should you make a purchase through one of the links I provide, I may receive a small percentage at no cost to you. Your purchase helps support my small business.

Can we be honest? The only reason I really love to go to Red Lobster is for those amazing cheddar bay biscuits. I mean the fish isn’t anything to write home about, but I can make a meal out of those biscuits. So today, I’m sharing a recipe for those lovely cheddar bay biscuits but with a little twist.

Just recently I decided to start a sourdough starter. I had started one last year, but with the multiple moves and taking care of my dad in hospice, I neglected it. So here I am starting it over again. If you have thought about starting a sourdough starter, I highly recommend Ballerina Farms. They take out a lot of the guesswork of a starter. They sell dry starters that you can reconstitute and then feed with detailed instructions. It’s great. They even sell the weck jars if you need them, though you can also purchase them on Amazon.

Sourdough Discard

One question I get asked a lot from new sourdough bakers is, “why you have to discard your some of your sourdough starer?” Well the answer is pretty simple. Your sourdough needs to be fed a certain amount of flour based on how many grams of starter you have. The more you starter you have the more flour you have to feed it. So it can require more and more flour very quickly. To remedy that, we discard some of the starter.

Now you can throw your starter away, although most people don’t do that. We can just add the starter to something we are baking and their tons of things you add it to – pancakes, waffles, cookies, and of course bread. I don’t recommend ever throwing it down a sink. It will become like concrete in your pipes. The best thing to do is just add it to something you are making. What if you don’t have anything to bake? No problem. You can keep a jar of sourdough discard in your fridge. Keeping it in your fridge slows down the bacterial growth and you won’t have to feed it for a while. Try to use the discard as quickly as possible though.

So this week, I decided to add it to a copycat cheddar bay biscuit recipe I had. The turned out amazing. They were fluffy and light and well…cheesy of course. I shared it on my Instagram and people asked for the recipe. So I agreed I’d include it here.

Are They Different?

Sourdough definitely yields a different texture when added to breads. Sourdough crusts tend to be tougher on the outside. Sourdough breads will typically have a tougher crust and a stronger center. Now you may ask why honey is included in this recipe. It offsets any sourness and it so small that you won’t even taste in the biscuits.

Ingredients and Tools

Sourdough cheddar bay biscuits are drop biscuits. This means that you don’t need a biscuit cutter or anything like that. However, I do recommend using am ice cream scooper for your dough. I have found using an ice cream scooper will help keep your biscuits, all the same size which ensures, even baking time and keep them looking uniform. Other than that you just need a cookie sheet and a large mixing bowl.

Some people make them like scones. If you prefer the triangle method, form your dough into a pie shape, then using a dough scraper or pizza cutter cut the pie into ⅛ slices. I still really prefer the round shape because they cook more evenly in my opinion.

Sourdough Cheddar Bay Biscuits

Sourdough Cheddar Bay Biscuit

Course Breads
Servings 8

Equipment

  • baking sheet
  • ice cream scoop or dough scraper
  • pastry brush
  • mixing bowl, medium

Ingredients
  

  • 1 Cup Sourdough starter 50% hydration starter
  • 1 Cup all purpose flour
  • 3 tsp baking powder
  • 1/4 tsp salt
  • 1 tbsp honey
  • 1 ¼ Cup shredded sharp cheddar cheese

For the butter topping

  • 4 tbsp butter, melted
  • 1 tsp garlic powder
  • 1 tsp dried parsley

Instructions
 

  • Preheat the oven to 400°
  • In a medium sized mixing bowl, add 1 cup of sourdough starter and 1 cup of all purpose flour along with the baking powder and salt
  • Add the honey and fold in the cheddar cheese until its fully combined
  • Using an ice cream scoop place scoops on a greased baking sheet
  • Bake in 400° for 10-12 minutes or until golden brown

For the topping

  • Melt the butter. Add butter, powdered garlic and dried parsley. Using a pastry brush, brush the melted butter on the warm tops of the biscuits and serve warm.
Keyword bread, drop biscuits, easy bread recipe, garlic bread

Storage

I would recommend storing the bread in an air tight container or at least a covered cake dish or something similar. They store for about three days so eat them quickly. You can rewarm them in the oven if needed. I find it is best to sprinkle the tops lightly with a little water before you put them in the oven. Be careful not to over bake.

If you are interesting in yeast baking, be sure to try my simple white bread recipe. Baking bread is not as hard as you might think. It takes a little practice but most people catch on very quickly. With all the rising inflation, baking things from scratch is definitely a way to save some money. Thanks for stopping by. Let me know how they turned out in the comments.

Scratch Pumpkin Spice Muffins

Fall is just around the corner and what better way to celebrate than with warm, scratch pumpkin spice muffins.

This post contains affiliate links. Should you make a purchase through one of the link I provide I may receive a small percentage at no cost to you.

So today, I’m going to share one of my favorite things. Pumpkin spice muffins. They are delicious and they are very easy to make. Years ago, I was very intimidated by baking from scratch. These days, I rarely used boxed baking goods. Today I thought I would share a funny story before we get cooking. If you’d rather head strait for the recipe, I’ll put a jump link below.

Once Upon a Time in England

Right after I graduated high school I went to England where I studied art. I was only 18 years old and so many things in England were different. First of all they use the metric system there. So trying to figure out how to make things with grams, etc took a lot of practice. Also, their temperatures on the oven aren’t just in celsius, but they actually have gradients called “gas mark.” I was stunned when I looked on the oven and it read “gas mark 1, 2, 3, etc.”

Anyway, I hadn’t been there long and I want to bake a birthday cake for someone. I went into our small co-op grocery store and searched the aisles for cake mix. Finally, after I couldn’t find it, I asked someone who worked there. “Where are the cake mixes,” I asked. The poor guy stood there confused. He had no clue what I was talking about. “Cake mix? What is that, love?” I was equally confused. How could someone not understand what a cake mix was. I began to explain. He stopped me mid-sentence and said, “we have flour and chocolate powder.” After a few more times back and forth I realized there was no such thing there. It was the first time, I realized just how spoiled Americans really are. We have so many conveniences here and we still complain about doing things. Well, that was back in 1998. I’m sure it may be different now.

That experience though, was the first time I had to bake a cake from scratch. Now, I bake nearly everything from scratch, but initially, I was terrified by it.

Making Scratch Pumpkin Muffins

I know that not everyone is a fan of pumpkin spice. I personally don’t really care for pumpkin spice flavoring when it is artificial. However, I love pumpkin spice when it is fresh. That’s why I love my Slowcooker Pumpkin Spice Latte which uses fresh pumpkin! You don’t need any special equipment to make this recipe. Just a standard muffin tin. You can totally hand mix this recipe as well. No need for a beater or stand mixer.

Full disclaimer, I’ve never tried making this recipe with fresh pumpkin. I’ve always used canned pureed pumpkin. The most important technique with this recipe is that the dry ingredients and the wet ingredients will need to be mixed separately first. I have found that this helps reduce lumps. If you don’t do this, you will have to do a lot of mixing to get the lumps out. This results in tougher muffins. If you are new to making breads, let me explain. The more you mix or knead a bread, the stronger and tougher it becomes. Muffins should be fluffy, moist and soft. That means you don’t want to over mix. Mix just enough to fully combine ingredients.

This recipe calls for vegetable oil but I have found you can use melted coconut oil just fine. This recipe also calls for baking soda in lieu of baking powder similar to many banana bread recipes. Don’t worry. I promise it will come out perfectly.

Tip: Use an ice cream scoop to add your batter to your muffin tin

scratch pumpkin spice muffins

Scratch Pumpkin Spice Muffins

Mary Lentz
No need to run out to a bakery to get some pumpkin spice muffins. This easy scratch recipe is simple to make and will satisfy any pumpkin spice lover.
Prep Time 10 minutes
Cook Time 20 minutes
Total Time 27 minutes
Course Breads, Breakfast
Cuisine American
Servings 12 muffins

Equipment

  • muffin tin
  • 2 mixing bowls
  • ice cream scoop
  • Spatula

Ingredients
  

  • 1 Cup Granulated Sugar
  • 1 ¾ Cups All purpose flour
  • 2 Tsp Ground Cinnamon
  • ½ Cup Light Brown Sugar
  • 1 Tsp Baking Soda
  • ½ Tsp Salt
  • ¼ Tsp Ground cloves
  • 2 Large Eggs
  • ¼ Tsp Ground Nutmeg
  • 15 oz Pureed pumpkin (1 can)
  • ½ Cup Vegetable oil
  • 1 Tsp Vanilla Extract

Instructions
 

  • Preheat your oven to 375°
  • Line your standard sized muffin tin with cupcake liners or grease with cooking spray
  • You will need to mix your wet and dry ingredients separately so prevent lumps and to keep the bread soft. In a large bowl, combine your flour, sugar, spices, salt and baking soda together. Set aside.
  • In a small bowl, add your, pumpkin, oil and vanilla and whisk well until egg is well combined.
  • Add your wet ingredients to your dry ingredients and using a spatula, lightly mix until they are combined and flour pockets are gone. Do not over mix.
  • Using a cookie scoop or ice cream scoop, scoop batter into prepared muffin wells. They should be filled up about ¾ full.
  • Place in the middle of the oven and bake for 20 minutes or until toothpick comes out clean.
  • Let cool for ten minutes before serving.
Keyword bakery style, breakfast muffins, comfort food, fall, fall desserts, fall muffins, fruit muffin, pumpkin, pumpkin spice

Variations

If you want you can also do some variations.

Pumpkin-Chocolate Chip

Turn your regular muffins into chocolate chip ones by adding a half cup of semi sweet chocolate chips

Brown Sugar Glaze

  • 1 tbsp butter
  • ¼ cup brown sugar
  • 3 tbsp milk
  • ¼ cup chopped pecans

To make the glaze, add all your ingredients to a small sauce pan. Bring to a boil for 1-2 minutes before

Cream Cheese Icing

  • ½ cup butter
  • 8 oz softened cream cheese
  • 3 cups powdered sugar
  • 1 tsp vanilla extract

Add your softened cream cheese, softened butter and vanilla into a stand mixer and and mix on medium with a paddle attachment. Lower speed and slowly add your powdered sugar one cup at a time until fully combined.

Other variations

You can also create different varieties by adding a half cup to one cup of any mix in such as chocolate chips, cranberries, or nuts. I’d start with a half cup and add more if desired. Some times add ins can be overwhelming so I suggest starting with a half cup first.

Scratch pumpkin spice muffins

I hope you enjoy this recipe. This makes for a yummy fall breakfast or even afternoon snack for the kiddos. Be sure also to take a look at my Fall Bucket List before you leave.

Simple Homemade Flour Tortillas

They are little rounds of heaven. You’ll be surprised to know how easy it is to whip up a batch of simple homemade flour tortillas tonight for dinner. Today, I’m sharing my authentic recipe straight from our Tex-Mex kitchen.

simple homemade flour tortillas

Homemade flour tortillas are one of the best things on the planet. Growing up in my Hispanic family, I loved it when my mom had a steaming hot, fluffy stack of homemade tortillas waiting for us. I loved smearing butter all over freshly warmed tortillas. They were so good.

Lately, I’ve been making them often. First, they are great for lunches for the kids. I grill them up with cheese and make quesadillas for their lunch. Sometimes I have some leftover meat, but not quite enough for a meal, that’s when I shred it up for tacos or quesadillas. I’m a little embarrassed to say that it doesn’t matter how many tortillas I make, we always seem to eat them all!

So today I’m going to show you how easy it is to make simple homemade flour tortillas right in your kitchen. They are far superior to store-bought ones and once you get familiar with making them, you won’t want the rubbery, chewy mass-produced ones.

Ingredients

Tortillas are a wonderfully easy bread because they require few ingredients. In fact, you may already have what you need. First, all you need is all-purpose flour. There is no need to use any kind of special flour. As I mentioned before, tortillas are unleavened bread, so you don’t need leavening agents like baking powder or yeast. However, you can add baking powder to make them fluffier if you desire. Really, all you need is flour, lard, water and a pinch of salt.

Traditionally tortillas are made with lard. I think lard makes the best version of tortillas. The tortillas seem to have a fluffier, smoother texture with lard. I highly recommend using lard above any other fat. However, if you don’t have lard on hand you can substitute other fats. You can also make them with butter, shortening and even vegetable oil in a pinch.

You can buy lard at the store in the butter section. It costs around the same price as butter and it stores in your fridge for months. You can even make lard at home (see video below). That’s right, don’t throw those drippings away!

Tools

Many people are discouraged from making tortillas for one simple reason – rolling out circles, I know I underestimated how hard it is to roll out a perfect circle. Like really hard! Personally, I don’t mind if mine aren’t perfect, but others do. I will say that it takes lots of practice to roll them out, so don’t get discouraged if they aren’t perfect. I guarantee you regardless of their shape, they will still taste amazing! So you can use two different methods to make them. You can roll them out using a rolling pin or you can use a tortilla press.

homemade flour tortillas

Tortilla presses are great because you put your ball of dough in, clamp down and it presses out your tortilla to the perfect thickness and size. It definitely makes them more uniform looking. Using a tortilla press also seriously cuts down on time. It takes far less time to press them as it does to roll them out. So if you are making them for a weeknight dinner, this really speeds it up. I highly recommend using a cast-iron one. I love mine.

Frankly, you don’t need any special tools to make tortillas, but I’ve used my stand mixer to speed things up as well as using a pastry blender if I am doing it by hand.

Also, if you make tortillas often, you may want to invest in a tortilla warmer. They really do keep them warm for a long while. They are fairly cheap too. If you don’t have a tortilla warmer, place a clean dishcloth inside a covered dish and slip them into the dishcloth to keep them warm.

Cooking the Tortillas

To make tortillas you’ll combine your ingredients – flour, salt, hot water and your lard. If you want them to be fluffier you can also add 1 teaspoon of baking powder. If you are substituting a different fat for lard such as vegetable oil or shortening you will use the same measurements as lard which is ⅓ cup. Mix the dough with a dough hook attachment on your stand mixer or you can use a pastry cutter to cut in the lard.

You can divide your dough into sixteen portions. That will make about 16 small 6″ tortillas or you divide into twelve pieces and it will yield about a dozen 8″ tortillas. I typically make 8″ ones.

Tortillas need to be cooked one at a time unless you have a long griddle, in which case you can do two at a time. Place the tortillas down on a griddle with medium heat. Cook for about 2 mins on each side. You will likely see the tortilla puff as it cooks. That is totally normal. Flip it over. The cooked side should have some light brown spots That’s how you know it is cooked! Then repeat on the other side.

How to Store Them

So you can choose to warm your tortillas all at once or you can choose to warm them up over a period of a couple of days. Store the ready-made tortillas in your fridge in a zip lock bag. You can separate them with wax paper so they don’t stick together. I recommend taking them out of the fridge about ten to fifteen minutes before you are ready to warm them up so they cook quickly and evenly on your griddle. I think they cook better that way than when they are a stone-cold temperature.

simple homemade flour tortillas

Simple Flour Tortillas

Prep Time 1 hour
Cook Time 25 minutes
Total Time 1 hour 25 minutes
Course Breads
Cuisine Mexican

Equipment

  • Griddle

Ingredients
  

  • 3 Cups All-Purpose Flour
  • 1 Tsp Salt
  • 1/3 Cup Lard, cold
  • 1 Cup Hot Water
  • 1 Tsp baking powder optional

Instructions
 

  • Add flour to a large mixing bowl.
  • Whisk salt and baking powder (optional) to the flour. Baking powder is optional but will give you a fluffier tortilla. Alternatively, instead of mixing by hand, you may use a stand mixer with a dough hook attachment.
  • Add lard to flour mixture and cut in with a pastry blender (or if using a stand mixer mix on low. You can also you use your hands if you don't have tools. You do not need to need the dough, only mix.
  • Slowly add water until a tacky dough forms
  • Turn out dough onto a well-floured surface. Divide dough into twelve pieces. Roll each piece into a ball about the size of a golf ball.
  • Heat a griddle on your stove at medium-high heat.
  • Begin by flouring your rolling pin to prevent dough from sticking. Take a ball of dough and roll it evenly into a 7-8" circle.
  • Place a tortilla on the hot griddle. The tortilla will puff as it cooks. Cook on each side for about 30 seconds. Flip regularly until you see light brown spots on the heated side.
Keyword bread, easy bread, flour, mexican bread, mexican food, tortillas, unleavened bread

That’s it! Enjoy your homemade tortillas with your favorite Mexican food dish. Be sure to check out some of my favorites like perfect Spanish rice and Creamy Green Chile Chicken Enchiladas.

How to Make White Sandwich Bread

No bread at the store? No problem. Today I’m going to show you how to make white sandwich bread the easy way at home. No special tools required!

how to make white sandwich bread
This post contains affiliate links. Should you make a purchase through one of the links I provide, I may receive a small percentage at no cost to you. I only link to things I personally love, own or want to own.

I’ve been baking up a storm during the COVID-19 outbreak. When all of this started, I bought tons of flour and a few pounds of yeast because I know that as long as you have those things, there are infinite kinds of bread that you can bake at home. Pizza dough, hamburger buns, dinner rolls hot dog buns. Later this month, I will show you how to make some unleavened bread (bread that doesn’t require yeast) like tortillas and pretzels. But today I’m going to share how to make white sandwich bread at home. Plain white sandwich bread is very versatile and you can conjure up lots of different lunches with some plain white bread. It’s a great recipe to try if you are new to bread baking. Once you get comfortable with simple white sandwich bread you’ll be excited to learn how to make other breads like bagels, ciabatta, baguettes, dinner rolls, buns, and pretzel bread.

Tools of the Trade

One question I get asked is, “do you need any special tools to make bread?” Not really. You certainly don’t need a bread machine. A bread machine just takes some of the elbow grease out of baking bread. You pop your dough in and it will knead and bake it for you and take a lot of guesswork out of baking bread. But let me tell you that baking bread isn’t as complicated as you might think. I was intimidated by it for years before I finally decided to learn. I was surprised at how simple it really is. You can make bread with just your bare hands and a loaf pan. After all, that is how people have made bread for centuries. However, if you would like to take out some of the work you can use a stand mixer with your dough hook attachment. That’s what I do. This recipe takes around three hours from start to finish, but nearly all of that time is rising and baking. The prep time is actually fairly quick.

dough hook
Dough hook attachment and bulk yeast

The only other thing you need is a work surface. A well-cleaned countertop is fine for that. Also, you will need a loaf pan. I have found that metal pans seem to bake bread more evenly than glass ones. I recommend using a small standard loaf pan because freshly baked bread doesn’t last very long. Unlike store-bought bread, it isn’t packed with preservatives to keep it from molding. So I keep the size small and eat it quickly.

I will however, introduce you to one of the best $30 finds on Amazon. This bread slicer was one of my best Amazon purchases! You slip your loaf inside the wooden guide and it allows you to cut perfectly sliced bread every time. I wasted a lot of bread because I wasn’t cutting it evenly or straight. This solved that problem! It even has a board underneath to catch crumbs. Incidentally, I save the breadcrumbs! Don’t buy bread crumbs from the store when you can make your own for making meatballs and breading meat.

(Click on the picture to purchase)

PRO-TIP: Always use a serrated knife to cut bread. Smooth knives will smash your bread rather than cut it.

Ingredients

So the first thing you need is yeast. Personally, I buy yeast at Sam’s Club because they sell it in two one-pound packages and it is way more cost-effective that way. Yeast is also sold in packets. If you use yeast packets you will need one full packet, plus 1/2 tsp more. I highly recommend refrigerating yeast once you open it. You can also store it in the freezer. If you have yeast in your pantry and you aren’t sure if it is still good, you can do a simple test. Pinch some dry yeast and put it in a cup. Add a pinch of sugar and a little warm water. If it bubbles after a few minutes, it is still good. If there is no or very little activity, it’s expired. The bubbling is called “blooming.”

After a few years of baking, I’ve learned that bread flour is superior to all-purpose flour when it comes to baking bread. I can definitely tell that it makes a stronger, denser, spongier bread. That is because bread flour has a higher gluten content than all-purpose flour. That said, I make this recipe with all-purpose flour all the time. There is no need to buy special flour for this recipe. Use your all-purpose flour if that is what you have. Someone asked me if they could use wheat flour for this recipe. In all honestly, I have not tried it. However, I will say that wheat flour is much denser than white flour and so you normally use less of it. Personally, I recommend finding a tried and tested wheat bread recipe instead of trying to alter this one.

When you are done baking your bread and while the bread is still hot, I recommend buttering the top. Bread tops can seem a little hard when they are baked. A simple brush of butter is all it needs to soften the top again and it makes it more like the sandwich bread you buy at the store.

dough

White Sandwich Bread

White sandwich bread is so easy to make and deliciously simple. You'll love being able to whip up soft, fluffy white sandwich bread in a few hours whenever you need it!
Prep Time 3 hours
Course Breads

Equipment

  • Loaf pan
  • Stand mixer

Ingredients
  

  • 1 Cup Hot Water
  • 2 Tbsp Sugar
  • 2 3/4 Tbsp Active Dry Yeast
  • 3 Cups All-Purpose Flour or Bread Flour
  • 1/4 Cup Vegetable Oil
  • 1.5 Tsp Salt

Instructions
 

  • In a stand mixer, add hot water, sugar, and yeast. Water should be very warm, but not scalding hot. Let it sit for 10 minutes to allow the yeast to bloom (bubble).
  • With your dough hook attachment on low, add vegetable oil and salt. Slowly add flour one cup at a time. Alternatively, you can mix ingredients by hand in a large bowl and knead by hand.
  • Turn up speed slightly and continue mixing by hand. The dough should cling to the dough hook, but not to the sides of the bowl after a few minutes. Mix for another 3-4 minutes until the dough is tacky.
  • Remove dough from the hook and place the dough in a large bowl and place it in a draft-free area of your kitchen. Cover the bowl with a clean kitchen towel. If you are worried about germs from the towel, spray some cling film with some baking spray. Cover the bowl loosely with it, then cover the cling film with the kitchen towel. Let the dough rise for 1.5 hours or until it doubles in size.
  • Once risen, punch down in the center. Then shape the dough into a long oval. Tuck any excess dough underneath the bottom of the loaf.
  • Grease a loaf pan. Transfer the dough to a loaf pan and cover again and let rise a second time for about an hour.
  • When done rising, bake at 350 degrees for 25 minutes or until golden brown.
  • While still warm, brush bread top lightly with butter before cutting and serving.
Keyword baked goods, bread, flour, sandwiches
how to make white sandwich bread

Storing Your Bread

I recommend storing your bread in a ziplock bag or an air tight container. If you bake often like I do, Amazon has some great bread bags that I use. I’ll drop the links below.

I’ve been asked before if you can freeze bread. In short, yes you can, but you will need to wrap it really well to prevent freezer burn. Also, make sure you freeze it before you it goes stale. Freezing won’t change staleness. If it was stale when you froze it, it will be stale when you thaw it out.

Alternatively, to save freezer space, you can also freeze dough that hasn’t risen. Make your dough and instead of letting it rise, freeze it. Once you are ready to bake, drop the frozen dough in a greased loaf pan. Get some cling film and lightly spray it with baking spray. Then cover the top of the loaf pan loosely with it. Layer a clean dish towel on top of the cling film. Let the dough thaw and rise for 7-8 hours. Then bake as normal at 350 degrees for 25-30 mins.

I hope you enjoyed learning how to make white sandwich bread. If you have questions feel free to leave them in the comments below and if I’ll try my best to answer them. Be sure to check out some of my other scratch recipes like Rich Fudgy Scratch Brownies.

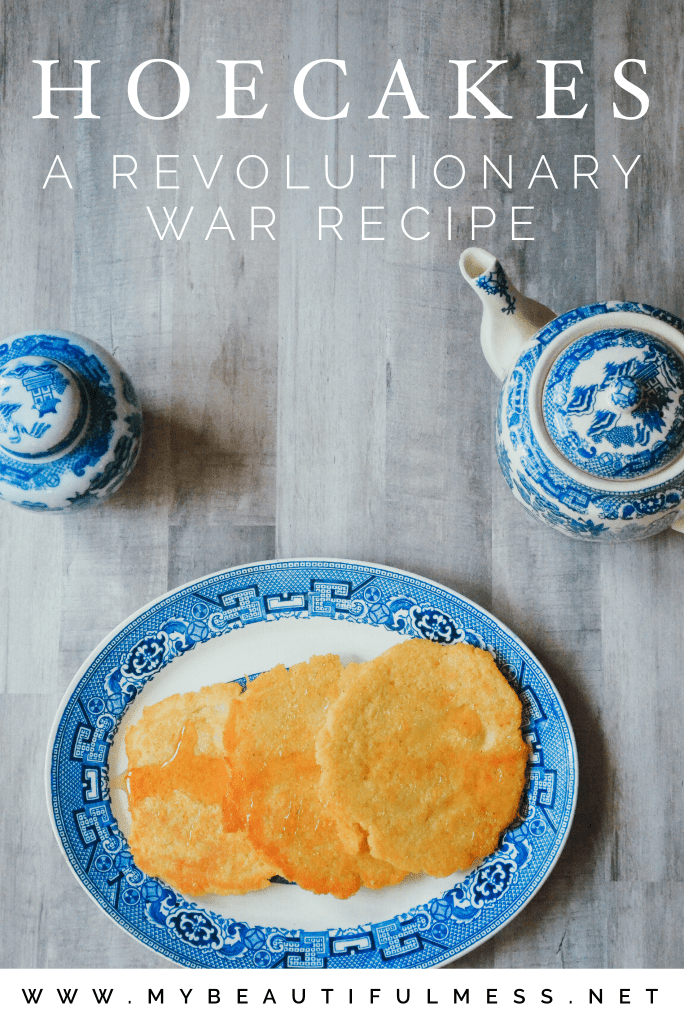
Hoecakes: a Revolutionary War Recipe

Try this fun 18th century colonial cornbread recipe with your kids this Fourth of July. Hoecakes: a Revolutionary War recipe.

Hoecakes a revolutionary war recipe

I thought I’d do something a little interesting and different here on My Beautiful Mess. Since July 4th is upon us, I thought I’d share a simple recipe for hoecakes: a Revolutionary War recipe. This Independence Day, why not try something our founding fathers used to eat.

What Are Hoecakes

American Southerners were the first to create this cornbread patty. Honestly, I’m not entirely sure how to describe it. I did a lot of research before trying this recipe a few times. Hoecakes resemble pancakes, but they aren’t. At best, they might qualify as a distant cousin. Pancakes are soft and fluffy and made with flour. Hoecakes are denser, tougher, and to me, almost seem like a hybrid between pancakes and corn tortillas.

hoecakes

A Quick History

In England in the 1600’s, a hoe was the name of what we now know as a griddle. Back then, it was common to bake cakes on griddles. In fact, cooking was very different back then. Food was cooked by a fireplace, specifically on the hearth. Cooks would place the pots and hoes on the hearth to cook. Then they’d move the pots close or far away from the fire depending on how hot it needed to be. Without cooking thermometers, women determined the temperature by how many seconds they could withstand the heat when their arm was placed in the fireplace (oven). Crazy, right? And you thought cooking today was a chore!

When settlers came from England, they had little imagination when it came to using corn. Corn had been domesticated by the Native Americans and to early settlers, corn was a crude substitute for flour. Since cornmeal didn’t not respond well to leveling agents and was naturally sweet, they simply fashioned it into small cake patties and fried it on a griddle. Thus hoecakes were born.

Hoe cakes were described as George Washington’s favorite breakfast in which he ate them slathered in “butter and honey.” Over the next century, hoecakes eventually became a dish of regional pride and a staple on the Southern colonial table.

Photo via Good Free Photos

The Modern Hoecake

These days, hoecakes, also called Johnny Cakes, are still a regional favorite here in the South. Today, ingredients like egg, milk, even flour are added to make it closer to pancakes. Sometimes spices and sugar are added to sweeten it up. However, for today’s purposes, we’re going to eat it like the colonists did.

How To Make Hoecakes

Hoecakes are simple to make. They are simply cornmeal and boiling hot water mixed into a batter and fried in a small amount of peanut oil. I’m sure you can use other oils if you’re allergic to peanuts. The consistency of the batter should be fairly thick. Closer to a wet dough than a batter. If it’s as runny as pancake batter, you’ve done it wrong. Secondly, I recommend using a non-stick skillet. I personally prefer to use my cast iron one, but since I haven’t season it yet, we’ll use a regular pan. Aim for making them around six inches.

Hoecakes are traditionally made with white cornmeal, but since I have yellow cornmeal, that’s what I’ll be using today. As I mentioned before, you’ll needed to use boiling hot water to make sure they don’t break apart when you try to remove them from the pan.

hoecakes

Hoecakes should have crispy edges and should be a glistening golden brown. Hoecakes are best when served warm. I recommend taking a cue from George Washington and using butter and either honey, maple syrup, and or cane syrup.

hoecakes

Revolutionary War Hoecakes

Try this favorite breakfast of George Washington and staple of the Colonia South with this American Revolution time recipe.
Prep Time 10 minutes
Cook Time 1 hour
Course Breakfast, Main Course
Cuisine American
Servings 6

Equipment

  • Skillet
  • Mixing Bowl
  • Spatula

Ingredients
  

  • 2 Cups Yellow or White Cornmeal
  • 2 Cups Boiling Hot Water
  • Pinch of Salt
  • Honey optional
  • Butter Optional
  • 12 Tbsp Peanut or Vegetable Oil

Instructions
 

  • In a pot or tea kettle boil 2 cups of water
  • In a large mixing bowl, add 2 cups of flour
  • Add a pinch of salt
  • When the water is boiling, start by adding one 1 cup at a time. Slowly stir. Continue adding the second cup of water. Mixture should pour by should be very thick almost like a very wet dough.
  • Let stand for 10 minutes so the cornmeal can absorb the water
  • In a medium high skillet, add one 1-2 Tbsp of Oil
  • Once oil is smoking, pour batter into the hot oil. Flatten and round with a spatula
  • Cook for 10 minutes
  • Gently flip and cook for an additional 10 minutes
  • Serve warm with butter, honey, cane syrup or maple syrup
Keyword bread, breakfast, comfort food, cornbread, cornbread recipes, cornmeal, flatbread, fried bread, pan fried, recipes of the south, southern recipes, unleaven bread

Thanks for reading! Take a look at some of my other Souther recipes like Shrimp and Crawfish Étouffée. Be sure to PIN this post for later and please subscribe to my blog for future recipes.

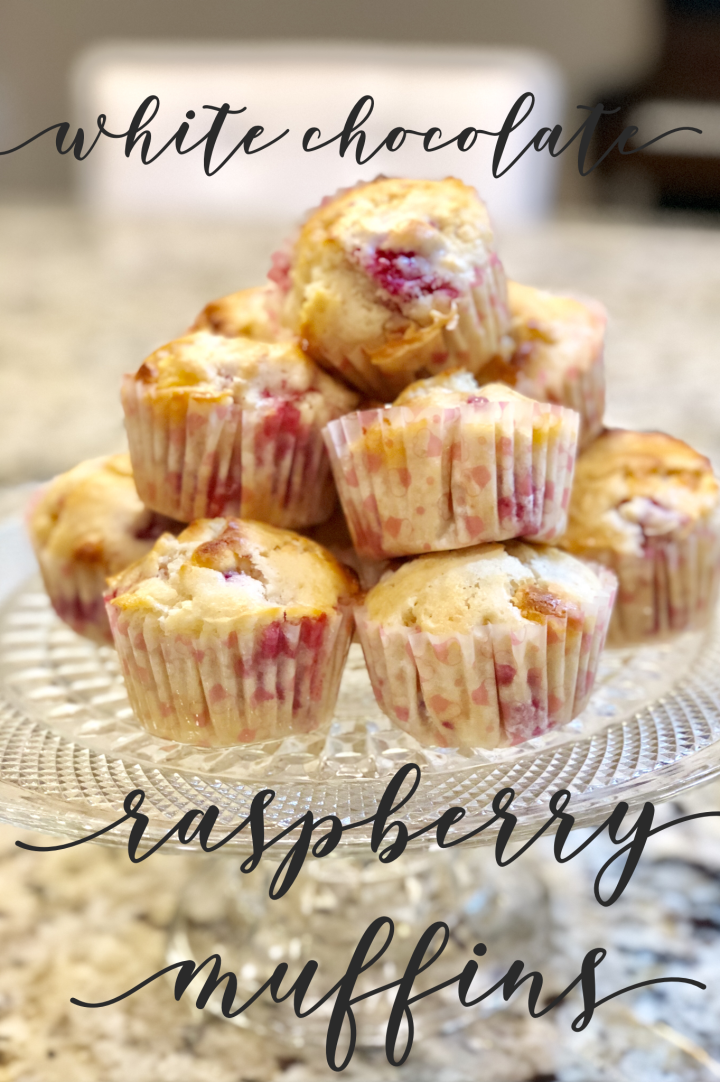
White Chocolate Raspberry Muffins

Warm white chocolate raspberry muffins are the perfect addition to your breakfast repertoire.

white chocolate raspberry muffins

Welcome! Today we are cooking up something yummy for breakfast. I’ve been making these amazing white chocolate and raspberry muffins for a few years and it all started with a kitchen throw down!

If you are unfamiliar with a throw down it’s where you use ingredients on hand to make something amazing. Part luck and part intuition, some recipes are fails while others are total wins. Well, I had a basic muffin recipe I’ve used over the years to make blueberry and chocolate chip muffins. Well, I had neither on hand, but I did have fresh raspberries and some left over white chocolate. Boy was this a happy accident. It has become one of our favorites!

Making White Chocolate Raspberry Muffins

I learned the secret to perfect to great muffins from a professional baker. He said that to keep muffins soft and fluffy you should avoid over-mixing. Mix just enough to the combine ingredients. Always either grease the pan or use a muffin paper liner. Otherwise your muffin will be impossible to remove. Additionally, you always want to aim for filling your muffin tin about ¾ of the way full. This makes sure to give you those beautiful golden-brown domed tops we all love. Lastly, when you remove them from the oven, you’ll also want to remove them from the pan. Letting them cool in the hot tin and cause them to dry out.

You can check muffins for doneness in several ways. First, muffin tops should be a rounded peak and golden brown in color. When touched the warm bread should spring back. Lastly, when you insert a toothpick directly in the center it should be clean and batter free when removed.

Muffins can be stored in a covered container at room temperature for about 3 days. You can also freeze your muffins for storage up to 3 months. Just make sure you wrap them well with heavy duty tin foil and then place in air tight freezer bags. Taking the extra step of wrapping tin foil will help prevent freezer burn.

Raspberry White Chocolate Muffins

Raspberries and white chocolate are the two delicious main ingredients in these simple scratch muffin recipe.
Prep Time 30 minutes
Cook Time 20 minutes
Course Breakfast
Cuisine American
Servings 12

Equipment

  • muffin tin
  • Mixing Bowl
  • Spatula

Ingredients
  

  • 1 Lrg Egg
  • 2 Cups Flour
  • ¾ Cup White Chocolate Chips
  • 1 Tbsp Vanilla Extract
  • 1 Tbsp Baking Powder
  • 5 Tbsp Butter Softened
  • 1 Cup Milk
  • 1 Cup Fresh or Frozen Raspberries

Instructions
 

  • Preheat oven to 400°
  • In a stand mixer, add egg and beat slightly
  • Add vanilla, softened butter, sugar, and cream on low until combined
  • Add milk
  • Slowly add flour and baking powder a little at a time. Mix only enough to combine ingredients.
  • Take bowl off mixer and add raspberries and white chocolate. Gently fold into batter
  • Spoon mixture into greased muffin tin or paper liners in tin.
  • Bake for 18-20 minutes or until tops are fully risen and golden brown.
  • Check for doneness by inserting a toothpick in the center. Toothpick should come out clean.
Keyword breakfast, easy breakfast, easy desserts, easy recipe, fruit muffin, muffin, muffin recipe, pastry, raspberry, white chocolate
white chocolate raspberry muffins